- Solutions
- AI First Services
- Business Outcomes
- Industry AI Accelerators
- Insights & Resources
- About
For business management solutions email us or call 020 3004 4600
For most businesses, marketing plays a pivotal role in helping to find new leads, qualifying them and passing them over to sales. So just how can you quickly identify these leads? This is where Dynamics 365 for Marketing comes in which through the use of a lead scoring model can help to score leads based on a specific criteria that includes both demographic and interaction information. In our latest tips and tricks article, we will take you through the process of how to create a lead scoring model in Dynamics 365 for Marketing.
Creating a lead scoring model
Step 1: Open Dynamics 365 for Marketing, then navigate to 'Marketing' then select 'Lead Management' then 'Lead Scoring Model'. When you get here, go to the main command bar and click on 'New'.
Step 2: This should bring up the 'Design' tab which you can use to start building your scoring models using a combination of condition/action tile pairs. The 'Condition' tile allows you to set a condition (for example when an email is opened) and the 'Action' tile provides you with the option to state how the score will change when this condition has been achieved (such as adding 50 points to the score).
This image was created by Microsoft.
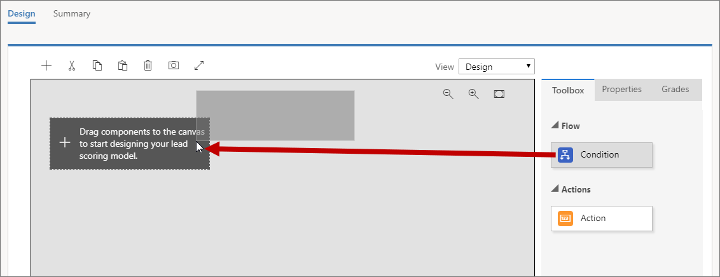
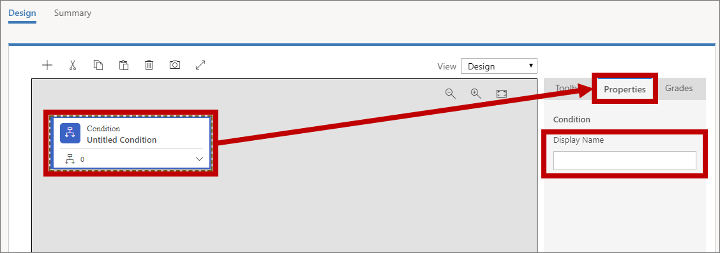
Step 3: Pull across a 'Condition' tile from the Toolbox on the right hand side and drag it to the first position on the design section. When you have dropped it, the 'Properties' tab will appear and show you the settings for it. This is where you will need to a create a condition, in this case we will choose to look at the city where a lead is living, so set the display name to 'City'.
This image was created by Microsoft.
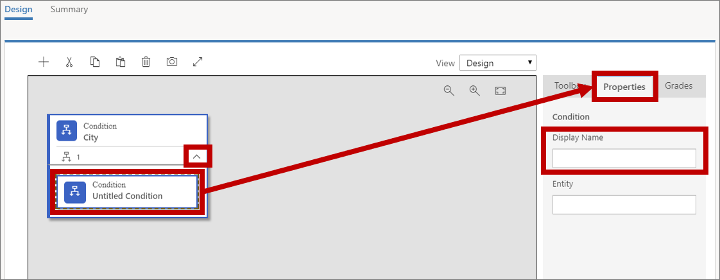
Step 4: From here you can expand the 'Condition' tile by selecting the down arrow to the right of it. This will show you that the 'Condition' tile you have just created is already attributed to a child 'Condition' tile. This is where the parent 'Condition' tile only provides a name for the stack where the child 'Condition' tile provides the rule. If the child condition criteria is met, the score will be updated in accordance with the 'Action' tile after it.
This image was created by Microsoft.
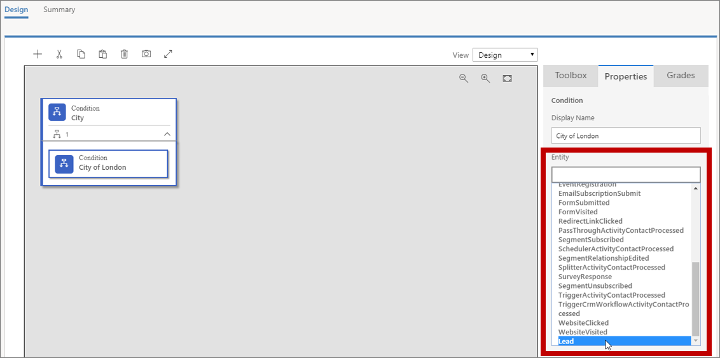
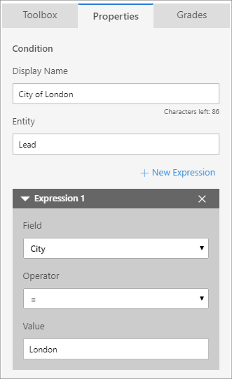
Step 5: Pick the child 'Condition' tile then go to the 'Properties' tab and choose a suitable 'Display Name' for your chosen tile. You are looking to increase your lead scores for London based leads, so type 'London'.
Step 6: Within the 'Entity' section you will need to place the insertion point. Dynamics 365 automatically pulls in a drop down list of scorable entities which includes all relatable entities that can be related to a lead record and the entity itself. You will need to find the name of the city in which the lead works so pick the 'Lead' entity option here.
This image was created by Microsoft.
Step 7: When you have picked your entity, you will see that an 'Expression' box appears which will provide you with numerous options suitable for your entity. For the purposes of this guide, make use of the 'Field', 'Operator' and 'Value' fields to put together an expression which says true where City = London.
This image was created by Microsoft.
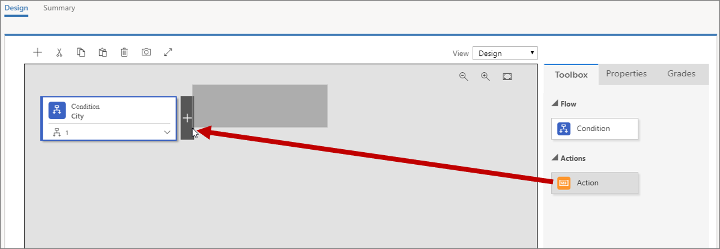
Step 8: From the design tab, pull across the 'Action' tile from the 'Toolbox' tab to the right of the condition that you have just setup.
This image was created by Microsoft.
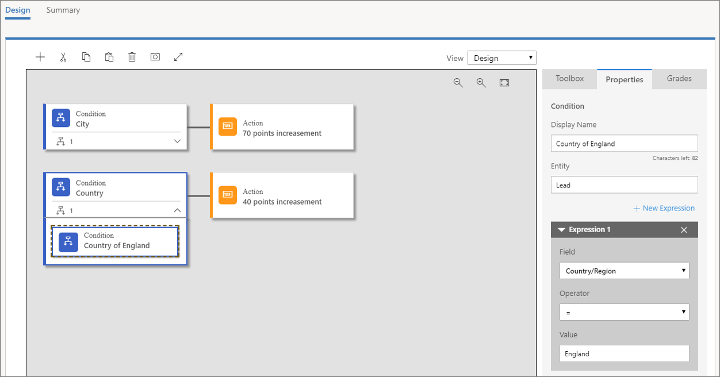
Step 9: After this tile has been dropped, it will remain selected and the 'Properties' tab will open to reveal it's current settings. This is the place where you can set how a lead's score is changed when the 'Condition' resolves to true. For the purposes of this guide, set the 'Score Update' to '+70' which will now give 70 points to any lead that works in London.
Step 10: By following the same steps that you have used to create the first rule above, create another rule below the first one and set it up to give +40 points to leads that are living in England (check the leads entity where Country/Region = England).
This image was created by Microsoft.
Step 11: Select the 'Grades' tab on the right hand side. Grades can be used to establish a schedule of grades associated with each of several score ranges but the most important metric here is the 'Sales Ready Score'. When a lead reaches this score it means it's sales-ready, for the purposes of this guide, any lead located in London, England is classified as sales-ready so we can set this to +100.

This image was created by Microsoft.
Step 12: Next, you will need to put your lead scoring rule live. This can be completed in the following steps:
Step 13: Once you have completed the above, within Dynamics 365 for Marketing go to 'Marketing' then 'Lead Management' then pick 'Leads'. From here, on the main command bar select '+New' to create a new lead.
This image was created by Microsoft.
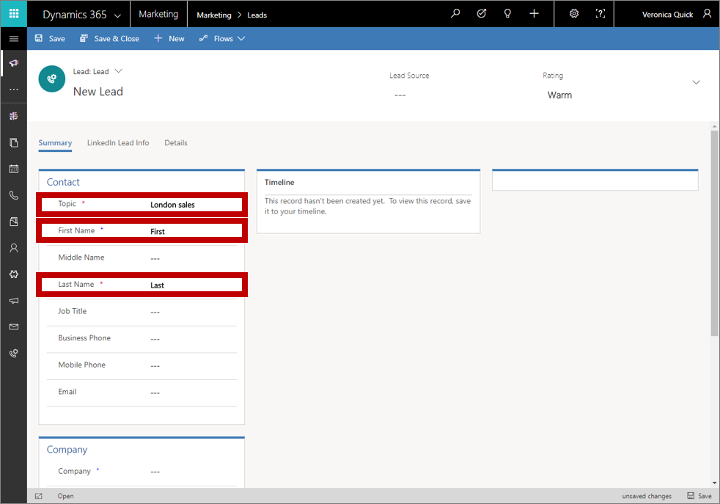
Step 14: After completing the previous step, in the 'Contact' section, pick a topic and suitable name then within the 'Company' section, set the 'City' to 'London' and the Country/Region to England then click 'Save'.
Step 15: Once this query has ran, go the first step in the business process flow from here make an assignment in the 'Existing Contact' field. Pick whichever contact you want then save the lead. You will now see the contact appear in the 'Stakeholders' section.
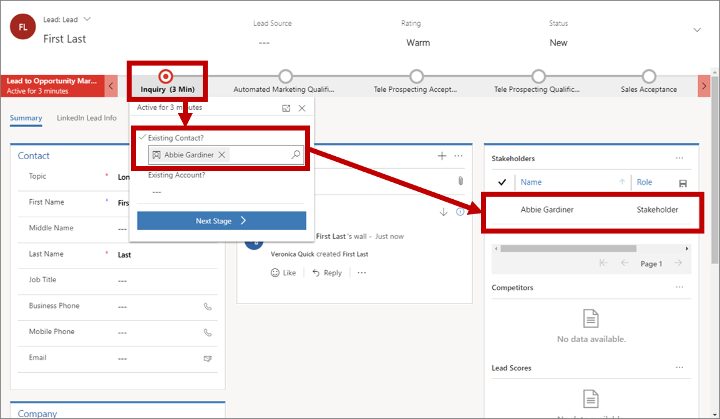
This image was created by Microsoft.
Step 16: Search for the 'Lead Scores' section which is in the bottom right hand corner, this will also show you each lead scoring model.
If you are interested in finding out more about leading scoring or Dynamics 365 solutions in general, then why not get in touch with Advantage today to discuss the best option for your business.
If you are interested in receiving more of our 'How to' guides , you can do so by signing up to our marketing emails by clicking here.
