- Solutions
- AI First Services
- Business Outcomes
- Industry AI Accelerators
- Insights & Resources
- About
For business management solutions email us or call 020 3004 4600
If your business operates in a fast paced sector or industry, you will find that, more often than not, you need your customers to submit an initial payment before you can provide them with a product or service, or if you are a vendor you may be required to submit a payment before a product or service is delivered to you.
This is where the Prepayment functionality in Dynamics 365 Business Central comes in handy. This feature allows you to not only to send out invoices and collect deposits or part payments from customers but also to ensure that all part payments are posted against an invoice.
In the first of our Dynamics 365 Business Central Tips and Tricks series, we will provide you with a step by step guide on how to setup prepayments in Dynamics 365 Business Central.
Preparing to setup prepayments in Dynamics 365 Business Central
Before you can start posting prepayment invoices, you will need to setup the posting accounts from within the general ledger, whereby you will have to setup a number series for prepayment documents.
From here you will be able to outline how much of the full amount will be invoiced for prepayment for items, customers and vendors. Once you have completed the setup process, you will then be able to produce and send out prepayment invoices for both sales and purchase orders, as well as being able to change the invoice amount and default percentages.
The reason behind this, is that the prepaid amount stays with the buyer until the product or service has been received. Therefore, you will need to setup the general ledger accounts to keep hold of the prepayment amounts until the last invoice has been sent.
How to add prepayment accounts to the general posting setup
Step 1: Open Dynamics 365 Business Central and log in into your account. From here, go to the search bar then type in 'General Posting Setup' then select the related link.
Step 2: After you open the General Posting Setup window, complete the following fields:
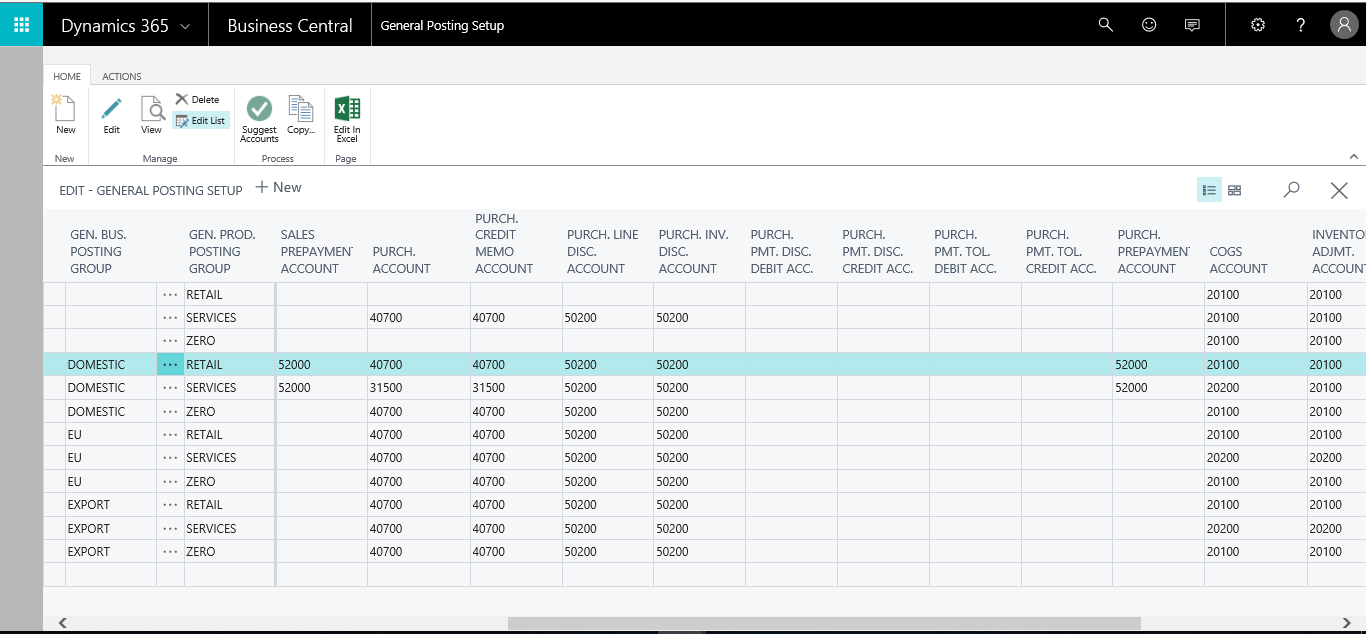
If you haven't setup your general ledger accounts ready for prepayment, you are now able to do this within the G/L Account List window.
How to setup number series for prepayment documents
Step 1: In your main search bar within Dynamics 365 Business Central, type 'Sales & Receivables Setup' and then pick the related link.
Step 2: Once this opens, within the Sales & Receivables Setup window, complete the following fields:
Step 3: Once you have done this, go back to the main search bar in Business Central and type in 'Purchases & Payables Setup' and again pick the related link.
Step 4: Once this opens, within the Purchases & Payables Setup window, complete the following fields:
NB: You can use the same number series for prepayment invoices and regular invoices. If you do decide to use a different number series, you will need to ensure that they don’t overlap as there must not be any numbers that exist in both series.
How to setup prepayment percentages for items, customers and vendors
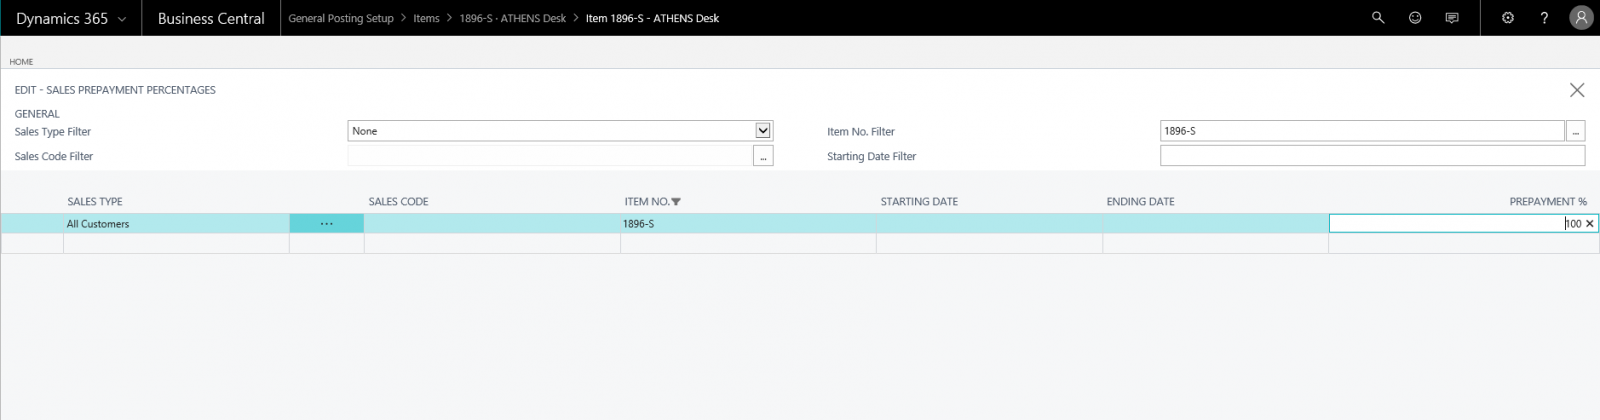
For Items
If you want to do this for an item, you will need to assign a default prepayment percentage for all customers, a specific customer or a customer price group. You can do this in the following steps:
Step 1: In the main search bar of Business Central, type 'Items' and then pick the related link.
Step 2: From here, pick an item and then select the 'Prepayment Percentages' action.
Step 3: When the 'Sales Prepayment Percentages' window opens, complete all the fields where required. If you are unsure of something you can hover over the field and it will provide a short description of what it is.
For Customers/Vendors
If you want to do this for a customer or vendor, you will need to setup one default prepayment percentage for all items and all types of sales lines. You will need to enter this on the customer or vendor card. You can do this in the following steps:
Step 1: In the main search bar, type 'Customers' and then pick the related link.
Step 2: From here, select a customer to open the card.
Step 3: Complete the Prepayment% field.
Step 4: Repeat the above steps for any other customers or vendors.
How to determine which prepayment percentage has first priority
An order may well have a prepayment percentage on the sales header with a different percentage for the items on the lines. In order to determine which prepayment percentage applies to each sale line, the system will look for the prepayment percentage in the following order and will apply the first default that it comes across:
What this means is that the prepayment percentage on the customer card will only be applied if there is no prepayment percentage set up for the item. If you decide to make changes to the contents of the Prepayment Percentage field on the sales or purchase header after you have setup the lines, the prepayment percentage will be updated across all of the lines.
If your business is struggling to setup prepayments in Dynamics 365 Business Central or requires some additional training or advice then get in touch with Advantage today to discuss your requirements with our Business Central experts.
Finding the above Dynamics 365 Business Central tips useful? If so, why not save yourself some time by signing up to our marketing emails to get these delivered straight into your inbox?
