- Solutions
- AI First Services
- Business Outcomes
- Industry AI Accelerators
- Insights & Resources
- About
For business management solutions email us or call 020 3004 4600
If you didn’t know this already, having an effective sales process helps to build the foundations for sustainable business growth. Despite this, ineffective processes can occur when a sales team expands or because there is a lack in knowledge or training resources.
In order to be able to meet these ongoing challenges, sequences within Dynamics 365 Sales are able to give sellers more guidance on what next steps they should take to progress a deal along the sales funnel.
In our latest blog article, we will show you how to build Dynamics 365 Sales Sequences
Before we delve into the main detail of the article, let’s define what Sales Sequences in Dynamics 365 are
You will find that by having sequences in place, sales managers as well as sellers will be able to build a whole host of predefined actions such as prompts at the right time to send an email or make a call.
The great thing about these is the fact that they are automatically triggered in the specific criteria to help take salespeople through each stage of the process. As well as helping to improve productivity it also helps to reduce the admin for the seller in addition to standardising sales journeys to be more consistent and improve the effectiveness of customer interactions.
If you use a sequence template, you will see that you can define branches designed to enable sellers to react quickly to customer responses. Furthermore, you are also able to personalise branches based on the type of prospect and the business process flow stage.
How can you purchase Dynamics 365 Sales Sequence licenses?
No need to worry as sales sequences are part of the sales accelerator feature for Dynamics 365 Sales. This feature can be used if you hold a Sales Enterprise, Sales Premium or Microsoft Relationships Sales license.
Who can manage the security roles for Sequences?
You will be pleased to know that any sales sequence can be configured by users with System Administrator, Sequence Manager or Sales Manager roles.
How to build Sequences
To get started, go to the Sales Hub, navigate your way to the Sales Insights settings on the bottom left of your interface:
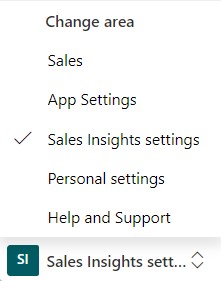
From here, go to ‘Sales Accelerator’ followed by ‘Sequences’ on the left-hand menu.
In order to get creating, simply select an existing sequence or hit ‘New’ to build your own one.
You will see you can either start from a blank canvas to build a unique sequence or edit a Microsoft template.
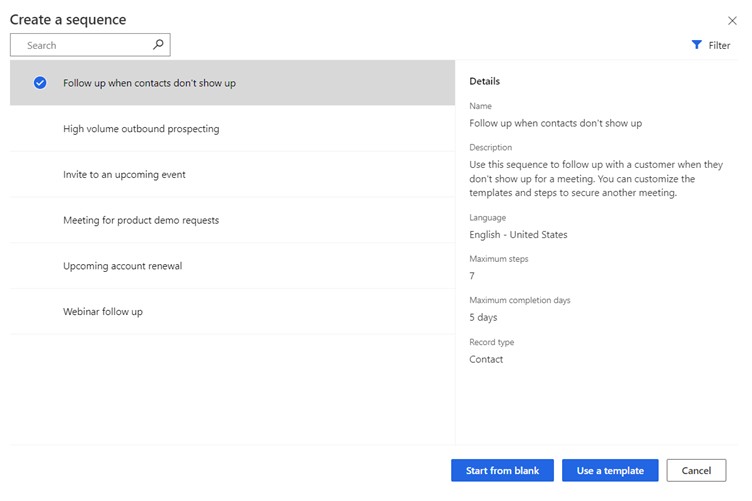
To put this into context through the use of an example, we will make use of the ‘follow up when contacts do not respond’ template.
You will also find that the pop-up window will give information on the configuration settings that are being used for that specific sequence. This will show actions such as the step count, duration and which entity is being used within the sequence. At the moment, sales sequences enable you to target Contacts, Leads, Accounts as well as Opportunities.
Once you have selected the configuration you want to use, you can add/remove steps and configure actions within your sequence.
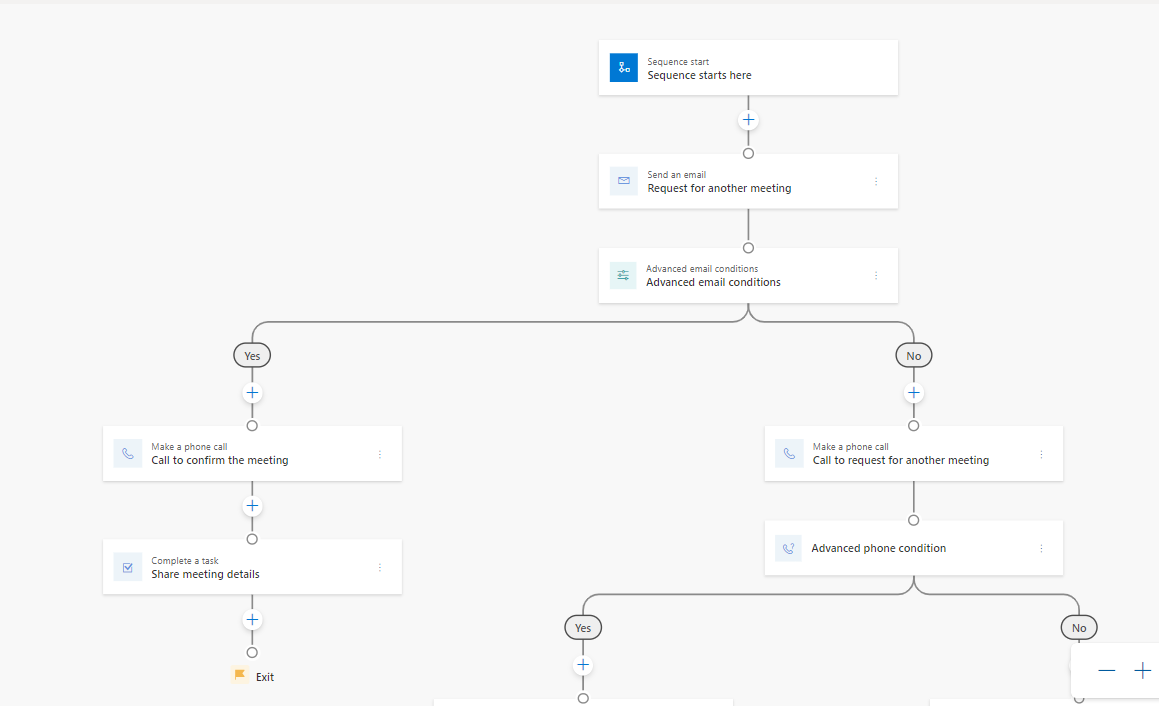
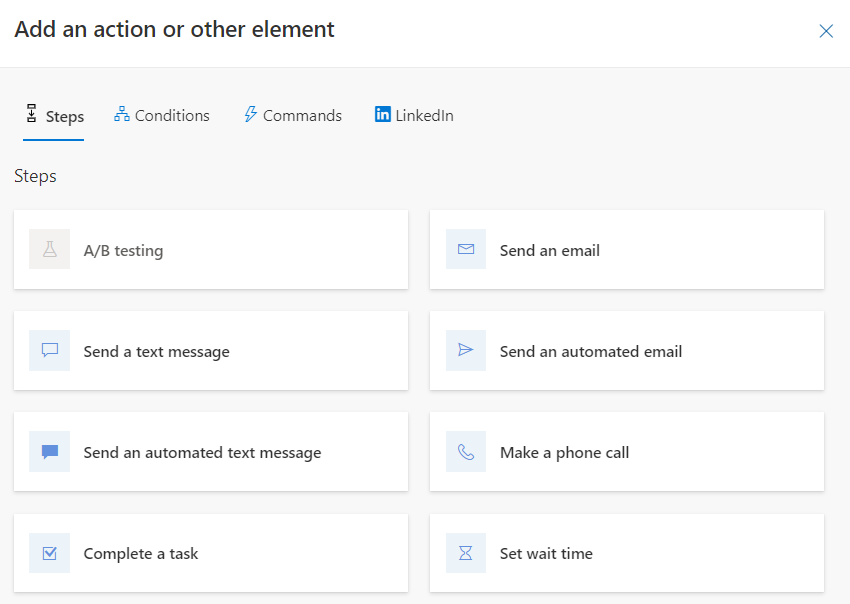
By choosing a ‘+’ icon on the sequence builder, you are able to choose steps, for example you can send an email or complete a task.
How to use adaptive Sales Sequences
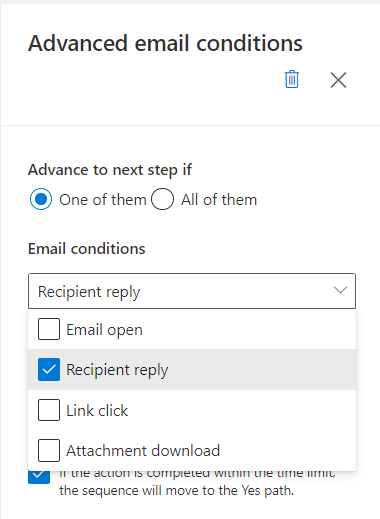
You will find that conditional steps are added to a sequence to showcase the next action if a condition is either met or not.
From inside these adaptive sequences, you can branch or end a sequence based on the yes/no result of the condition.
You will notice that the conditions are available for email, phone call, field value as well as the business process stage.
For example, how a sequence begins could depend on whether a customer has opened an email or not. Through the use of a field value criteria, the process would only proceed if a record matches up with the predefined attributes for an address or job title.
You will also notice that sequences provide you with an opportunity to use commands to advance to other sequences and add updates that will be shown in the work list and ‘up next’ widget.
Also, you can integrate with LinkedIn Sales Navigator if you wish.
This gives you the chance to add a LinkedIn activity to a sequence. For example, you could add sending an inMail.
You will find that these commands help sellers to gain a better understanding of customers before they get in touch and move them through to the next step in the sales funnel.
You can pick each existing step to adjust the process to suit your requirements. When choosing a step, a panel will be shown to the right-hand side of your interface, enabling admins to make tweaks as required, such as creating conditions to proceed or choosing an email template.
Make use of your Sequences
You will find that the top menu allows Sales admins to assess the configuration of the sequence. From the properties tab, you will be able to add a description and who this specific sequence is assigned to such as the record owner.
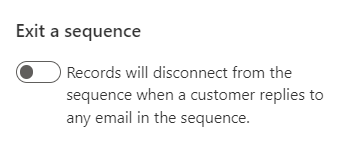
As well as this, you can build the sequence exit criteria via the top menu. To put this into context with an example, you could choose to disconnect a record from the sequence when there has been a reply to any email message. This would prove to be handy for situations where the sellers would like to receive updates from the record and don’t wish to continue forwards with unnecessary steps such as text messages which may scare off the prospect.
After the sales admin is happy with the configuration that has been built, they are then able to save it and then select ‘Activate’ from the top menu.
You may also want to know about a useful feature called version history. It works every time sequences are edited and saved whereby a record will be created and the previous versions can also be selected. This allows sales admins to be able to manage any variations without having to build a new sequence from scratch and preserving a record of every version.
How to link sequences with your Sales Records
Following on from the above, you will now have to connect records to the sequence, which can be done in one of two ways:
Firstly, connections can be added manually by picking the specific records or you could do this by selecting a segment, a record will start the sequence when a certain condition has been met.
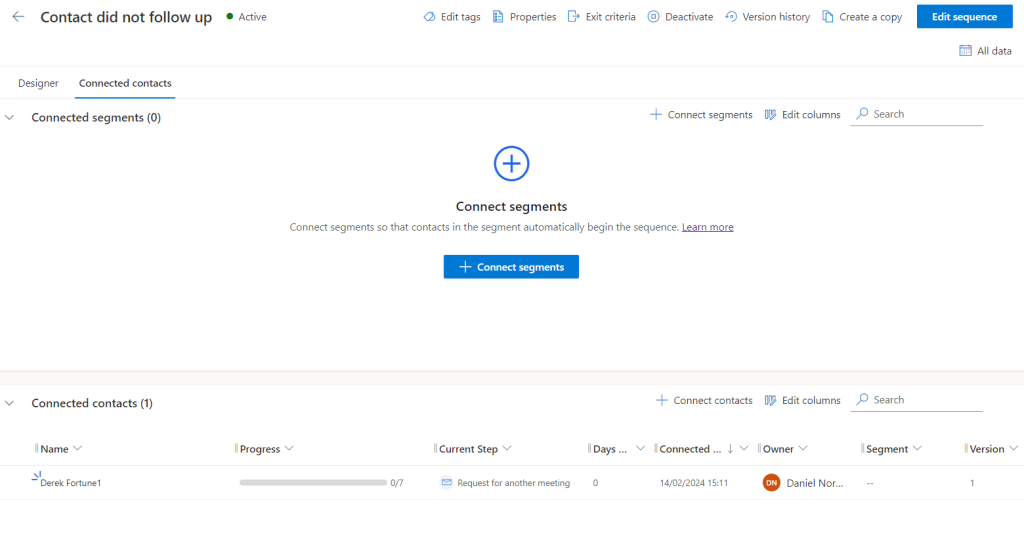
When a record is added, you will find that they are shown in the list above, which shows their progress, current step, the owner and much more by default.
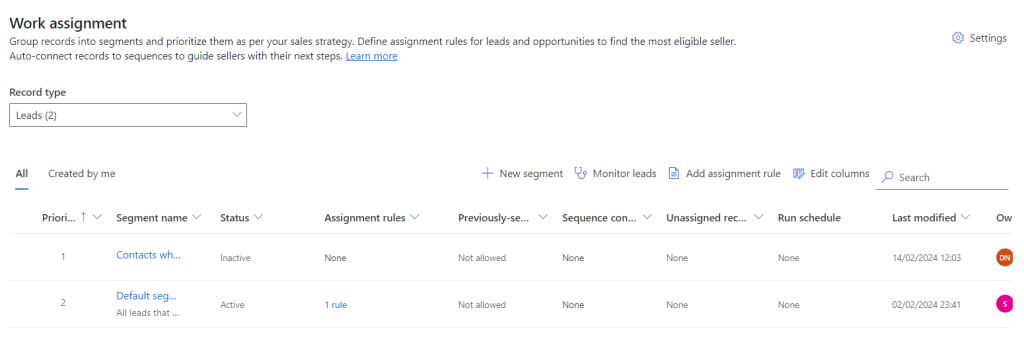
Through the work assignment function, you can build segments of records matching specific conditions and connect these up with sequences that perform actions based on matching records.
If you didn’t know this, segments are a collection of records that match up with your specific criteria. To put this into context with an example, you could build a segment of leads for a certain product or service.
To be able to create or adjust a segment, head to ‘Work Assignment’ on the left menu panel. Also, you can pick the priority of which segment will take precedence over another and set assignment rules.
By picking an existing segment or building a new one, you are able to pick the criteria of how records are brought into the segment.
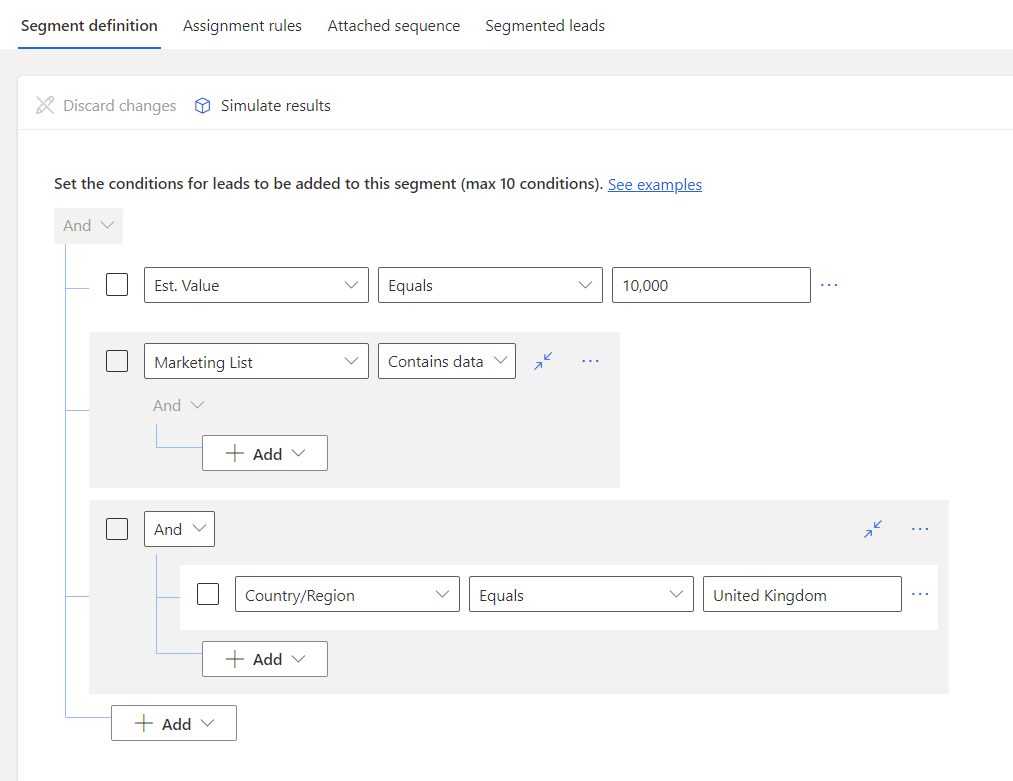
You can select which fields are to be used and the necessary conditions needed to meet the criteria. To give you an example of this, our lead segment definition includes the estimated value and country fields.
You can select if multiple conditions are needed for the criteria to be met. Another way of doing this is that you can select ‘Or’ whereby if any of the individual conditions are met, they will put into the segment.
In order to see this in action, simply choose ‘simulate results’ to check the accuracy of the segment according to before this is published.
Seeing Sales Sequences at work
After sequences are configured and activated in your Dynamics environment, sellers can pick up these actions by going to the sales accelerator work list.
If you didn’t know, work lists enable sellers to focus time and effort on prioritising assigned tasks to make sure that necessary actions aren’t missed.
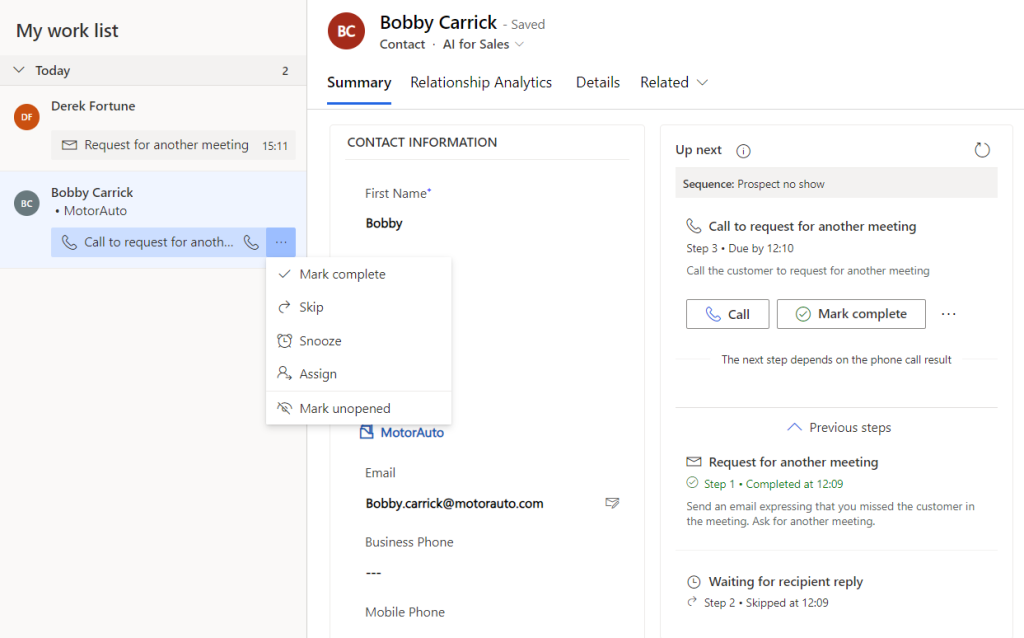
For each sequential item in the work list, sellers can make quick changes, such as Mark as complete. Depending on the next step, they can perform their action, such as a call or email.
The sales form will be shown when you pick a record from the work list. At this point, the sellers can perform the previously mentioned tasks and view the previous steps that have been made. As well as this, it also gives greater contextual information about the sequence and enables extra notes to be added at each step.
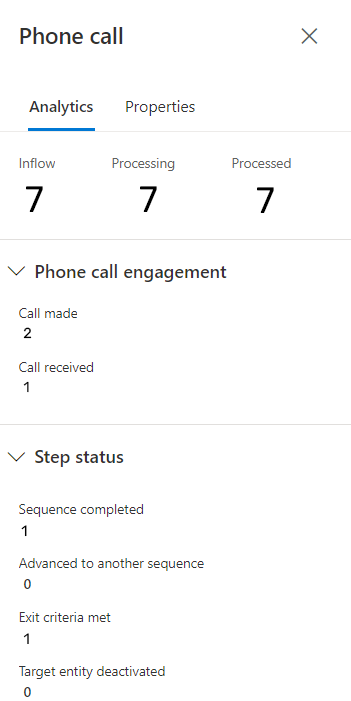
Sequence Insights
You will find that the sales team will want to understand how their sequences are performing. How many calls have been generated? How many clicks have there been on emails? You can dive deeper into the analytics of each step in the sequence to understand where people are engaging and dropping off in the sequencing process.
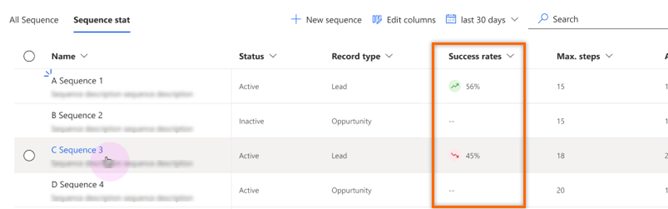
If you are looking to assess the performance of a sequence with leads or opportunities, you can see the success rate via a snapshot view, giving your sales team a great starting point to change the sequence processes going forward.
Getting along with Sales Sequences
You will notice that sequences can help automate the inefficiencies of organising and sending out standardised communications and processes. This solution is perfect to help sellers to standardise processes and focus on critical tasks to help all salespeople in the business to sell much more effectively.
In the past, using previous iterations within the Sales Hub was often difficult to use and maintain or required extra knowledge of complicated flows and technical skill sets. Nowadays, sequences give sales managers the tools to enable their teams to prioritise activities and to focus on selling to speed the sales process up.
As the adoption builds across the business, we can see sequencing becoming a core Sales Hub feature to help boost productivity and make it easier for sellers to align activities within organisational processes.
In Summary
We can see that sequences now use four entities: accounts, leads, contacts and opportunities. However, users are only able to use leads and opportunities in the segment builder. To Advantage, this feels like a missed opportunity and means that those who are looking to use contacts and accounts must manually select contacts to start the sequence.
As well as this, segments only allow sales admins to pick attribute fields to outline the segment requirements. If your business is using Dynamics 365 Customer Insights, you will understand that you are able to build a marketing segment through the use of behavioural events such as email clicks. We are in hope that this functionality could enable sequences to be triggered by a similar behaviour attribute, put simply this means a sequence could start without any engagement from the seller. Hopefully Microsoft sees this as the next logical step in its development in future updates.
Next Steps?
If you are a business that is looking to implement Dynamics 365 Sales via one of our Quick Start packages or have Dynamics 365 Sales already and are looking for some extra Dynamics 365 consultancy to help you to maximise your use of sales sequences then please reach out to our team of Dynamics 365 experts to see how we can help you to transform the way you sell.
Are you wanting to receive more in-depth articles like the above? You can if you sign up to our mailing list.
