If you use Dynamics 365 on a daily basis, you will want to know all about how you can speed up your day to day efficiency and productivity.
With this in mind, have you ever wanted to have a field in Dynamics 365 to be set as an auto-complete field?
If the answer is yes to the above question, in our latest tips and tricks article, we will take you through the steps of how to setup Auto-Complete Control in your Dynamics 365 solution.
You can achieve this by following the below steps:
Step 1 – Setting up
In our chosen example, the Country field is being impacted by the Auto-Complete control. You will see that the Country field is a native text field and not a custom field or being rendered through the use of code.
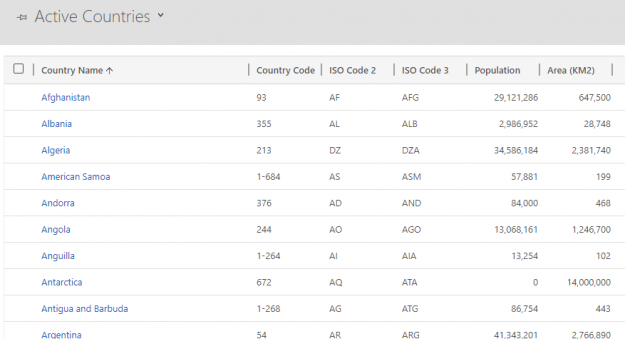
The next step of the setup is a custom entity called ‘Countries’. Within the Country entity, we have setup a simple form and have uploaded all the available countries into the system through the use of Excel.
Custom Country Entity
Countries List
Step 2 – Setting up the field properties
After completing the above, you will need to setup the Field Properties of the Country field. In order to do this, you will need to make your way over to the Customisations area and pick an Account form to edit. Once this window opens, simply click on the ‘Country’ field and then from here select ‘Change Properties’.
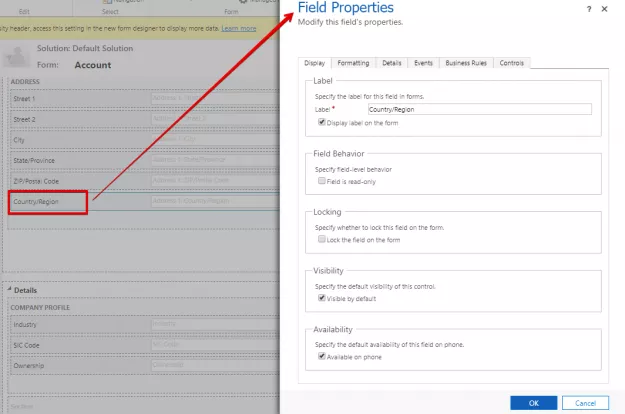
Once you have navigated to this, you will then need to select the ‘Controls’ tab from within the ‘Field Properties’ window. After completing this, you will need to add and setup the control. To do this, simply select ‘Add Control’ and select ‘Auto-Complete’ from the list. Once you have done this, you are able to select the row of the control named ‘Auto Complete’ which will reveal all the setup options.
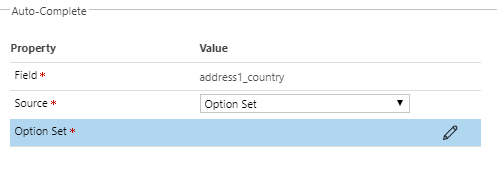
Step 3 – Setting up Auto-Complete
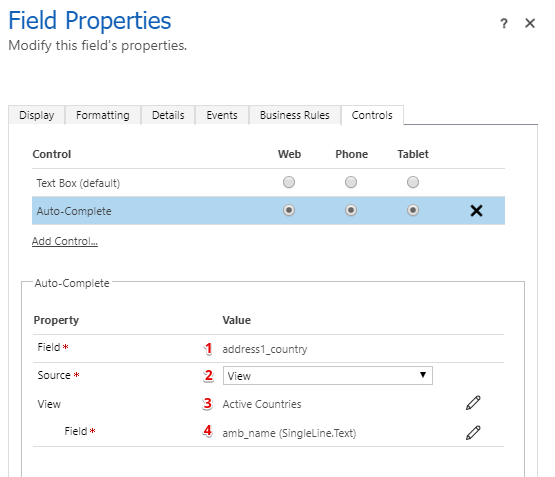
As you can see from the above screenshot, there are a few properties available.
- The first property is ‘Field’ and the Value is the schema name of the field
- The second property is ‘Source’ where you will select either ‘View’ or ‘Option Set’
- If you pick ‘Option Set’ you will then be asked to pick an option set.
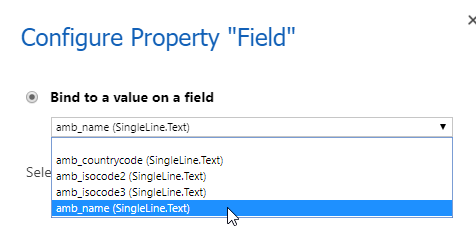
- The third property is ‘View’. After you hit the pencil icon, you will see that it will open a Configure Property window. From here, you can select the Entity and the View.
- The fourth property is ‘Field’. This field is taken from the Entity selected in the previous property. After the control is bound to the Country field, it will present a list of the Country Names.
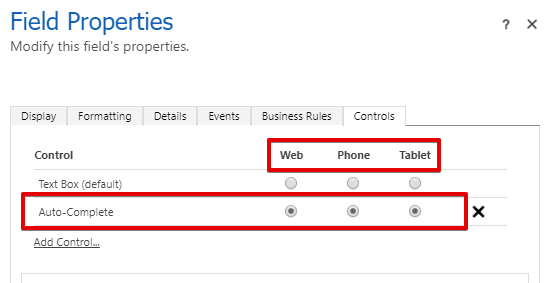
Step 4: The Finishing Touches
After you have completed the above, you will need to complete the configuration. What you will need to do is choose where you wish the control to be displayed. The options that are provided include Web, Phone or Tablet. For the purposes of this example, we’ve selected all three. However, you can choose whichever options you prefer.
Control Display Options
After you have completed this, you will need to select ‘Save’ and ‘Publish’ the form. After this form has been published, refresh the form in the browser to see your updates applied. That’s it!
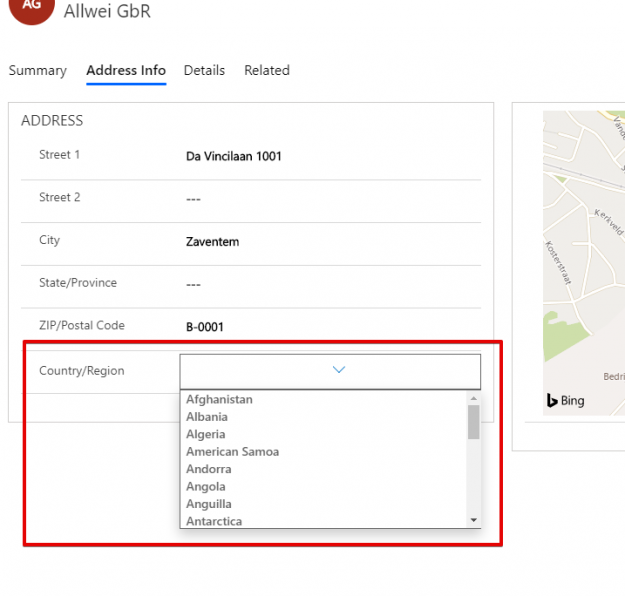
The above example shows the very basic Auto-Complete control. However, as you can see, it shows an alternative to lookup fields. Also, through the use of this, you don’t have to set up relationships between the entities. The configuration of the control makes it easy for you to bind the field to any entity and field.
If you have any further questions or queries about how to make the most of your CRM solution, are looking for additional CRM support or looking for a Dynamics 365 solution then please call our team of CRM experts today to discuss your requirements.
If you want to receive similar articles to the above, then please sign up to our mailing list today to get these delivered straight into your inbox.
