For many businesses using Dynamics 365 on a regular basis, there are always likely to be occasions where you need to add data from a web form into Dynamics 365.
As you will know already, most forms are usually managed with your own content management system with numerous solutions available to allow you to integrate these into your existing Dynamics solution, however on certain occasions the easiest way to do this would be through using Microsoft Forms alongside Microsoft Flow. In our latest tips and tricks article, we will take you through the process of how to convert web forms into Dynamics 365 leads with Microsoft Flow & Microsoft Forms.
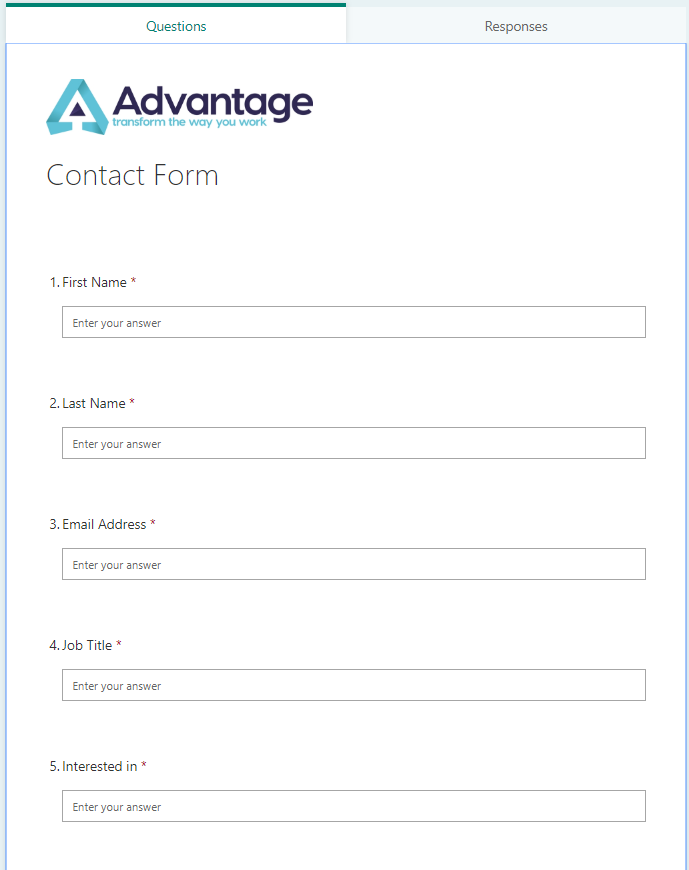
Let’s say that your business requires a contact form or a basic form to be connected with CRM.
Microsoft Forms is the perfect place to start where you can easily build a web form within your Office 365 account.
The first step on your journey will be to create a brand new form which contains each required field. You can learn how to create a Microsoft Form here.
In the example below, we’ve created a brief contact form by making use of the native drag and drop controls:
Once you have created the form like the above, you can share it in 3 different ways:
- URL – Link to the form in an email or from a page on your website
- IFRAME – Copy and paste the code to embed the form on a page on your website
- QR – Simply scan the code to allow you to access it on your mobile.
For the purposes of this example, we are going to import new form submissions as lead records in Dynamics 365. In order to do this, we will need to ensure that each form question can be easily mapped to an existing Dynamics 365 field on the lead entity.
This will largely depend on what type of form you are using as there may be one or more fields which can’t be matched to their equivalent in Dynamics 365. In this case, you will need to get your designated Dynamics 365 admin to add this before you can map the data.
Once the above has been completed, all the individual form fields can be easily mapped up to their corresponding CRM entity.
Through the use of Microsoft Flow for this process, you can substantially reduce the complexity of the process compared to other ways of integration.
Start by going to your Office 365 account, then within your Office 365 menu, go to Flow then select the ‘New’ option followed by the ‘Create from blank’ option within the Flow menu.
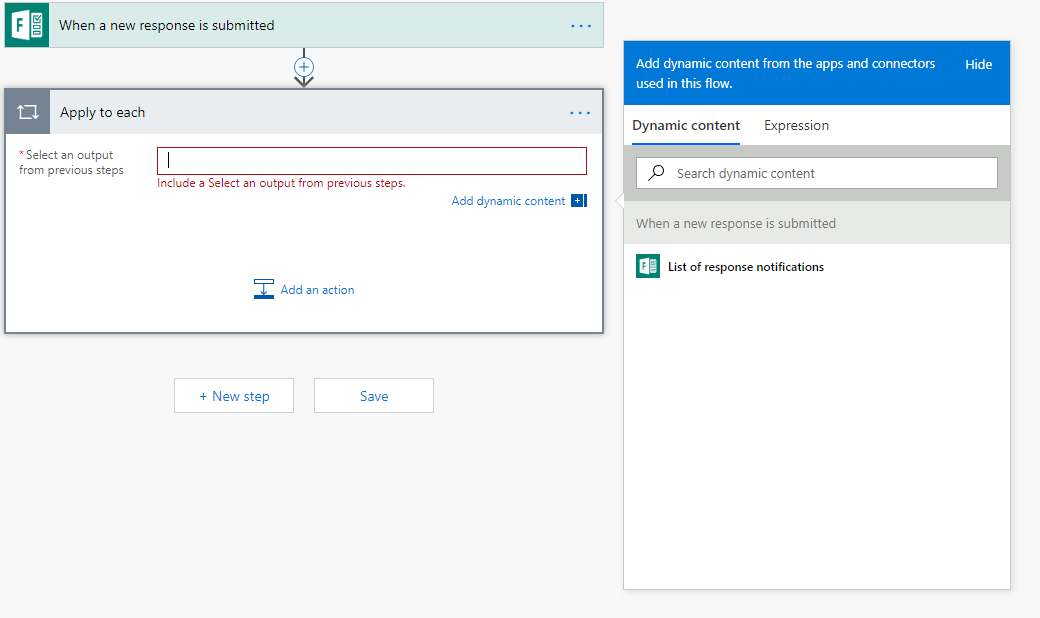
Next, in the Flow trigger search box type ‘Form’ and then select ‘When a response is submitted’ then from here choose the form you created.

From here, click on ‘New Step’ and then type ‘Apply to Each’ in the search box and select the relevant option. This process should run each time the form is posted so an 'Apply to Each' control is dragged onto the Flow canvas. Next click in the box and pick the ‘List of response notifications’ on the right hand side.
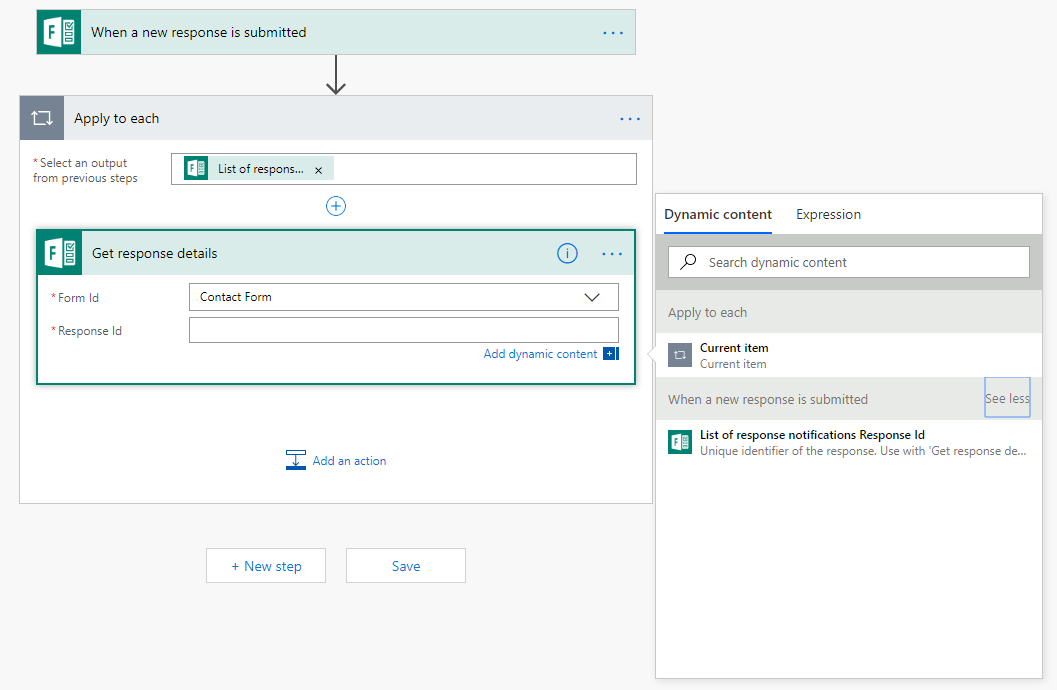
Next click on ‘Add an action’ and type ‘Get response details’ in the search box. Select ‘Contact Form’ as the Form ID then click in the Response ID box and then click on ‘see more’ on the right hand pop up which should reveal a ‘List of response notifications Response ID’ option which you need to select.
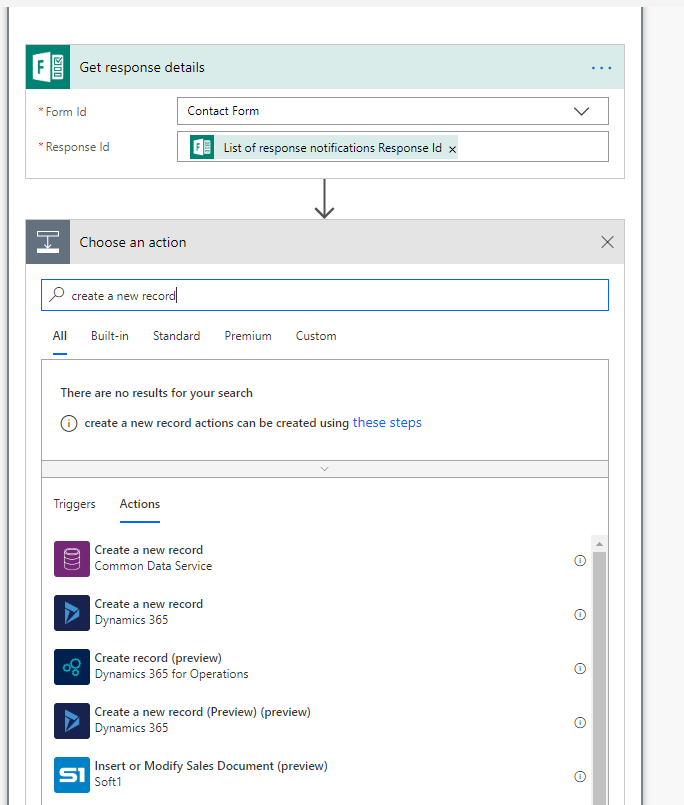
Once you have completed the above, click on ‘Add an action’ then type ‘Create a new record’ and select ‘Create a new record Dynamics 365’.
Once you have completed the above, pick the relevant Dynamics 365 instance where new records need to be created and what entity these should be created as.
For the purposes of this example, we’ll create the new records as Leads:
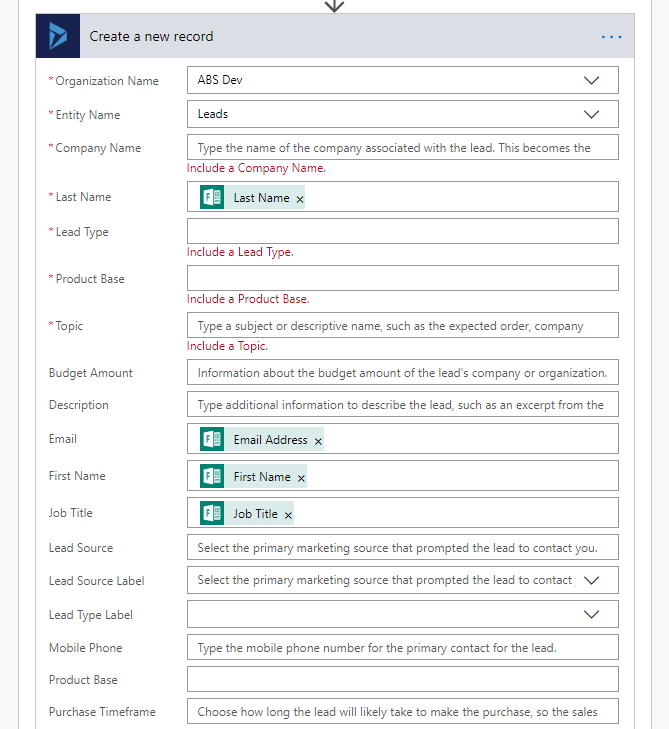
You will need to go through this to ensure that each form field is mapped to its corresponding lead entity field. You will see from the above that we’ve referenced the First/Last Name, Email Address and Job Title fields.
Once the completed flow is saved and the associated form is submitted the process will run as defined.
This will then create a lead record automatically with the form data pre-populated in the pre-determined fields.
Once this data has been added into your Dynamics 365 solution, a number of options become available to help you configure processes to allow you to alert users that action is required. This can come to include some of the following:
- Automatically sending out an email notifying teams about a new actionable form post.
- Automatically scheduling an activity that will prompt users to follow it up when the form leads have been added.
It is important to note that Microsoft Forms doesn’t cater for every single requirement possible so there are some limitations to take into account when using it. Currently, forms doesn’t support any duplicate detection and newly created records don’t automatically link to existing Dynamics 365 records. However, this connection can be achieved through the use of a plugin to apply a link once data has been added to Dynamics 365 based on individual matching rules.
If you are looking to upgrade your existing Dynamics 365 solution, need additional Dynamics 365 training or require additional Dynamics 365 support then get in touch with Advantage today to discuss your business requirements.
If you want to hear more from Advantage, then why not sign up to our mailing list to get all the latest Microsoft updates, tips & tricks, upcoming events and webinars and more straight into your inbox!
